
Integrations and API
Webhooks
Use webhooks to let Quenza notify your CRM or another application automatically when a client is created or accepts their invitation.
A webhook sends a message from Quenza to another application as soon as something happens in your workspace. For example, when a new client is created, Quenza can tell your CRM, your email marketing tool or an automationAutomationThe part of a signup form that decides what new clients receive when they join through it, such as activities, programs, groups and resources. platform like Zapier or Make, so the client is added there too.
You need to be a workspace Owner or Manager. Webhooks are not included in every plan, and the number of webhooks you can add depends on your plan. See Plans and pricing.
Sarah Bennett, for example, sends a monthly newsletter from her email marketing tool. With a webhook, every new client in Quenza is added to her newsletter list automatically, including people who sign up through her landing pageLanding pageA public web page about your practice with a signup form. Visitors who sign up arrive in your workspace as clients.. See the Zapier example below.
Setting up a webhook needs an address that can receive the messages. You usually get it from the system you want to connect, or from a developer. To send data into Quenza instead, use the Quenza API.
Events you can send
Section titled “Events you can send”Quenza sends webhooks for two events only. There are no webhooks for activities, programs, tasks, chat or other changes.
| Event | Name in the request | Sent when |
|---|---|---|
| Client Created | client.created |
A client or guest is added to your workspace: by hand, by import, through the API or through a landing page. It is also sent when you convert a guest to a client with an account. |
| Client Invitation Accepted | client.invitation_accepted |
A client accepts their invitation and sets up their account. |
Add a webhook
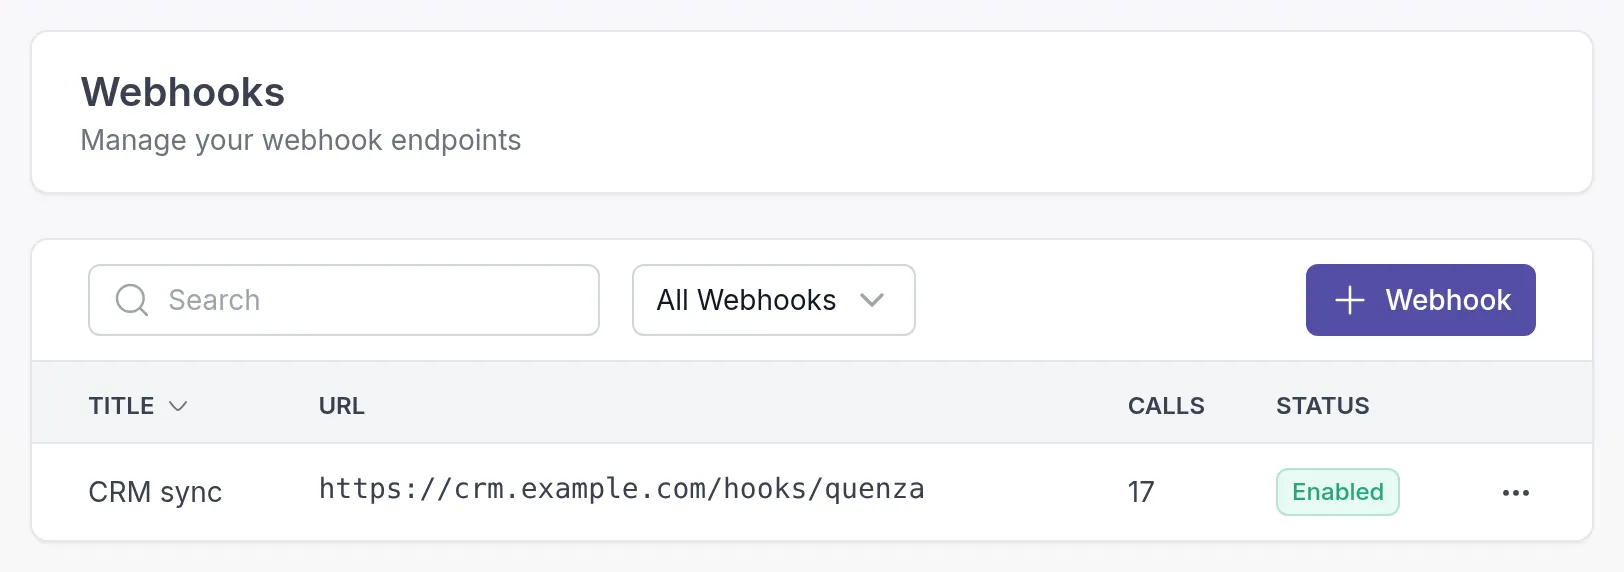
Section titled “Add a webhook”Your webhooks are under Developer Tools → Webhooks in the left menu. Click + Webhook to add one.
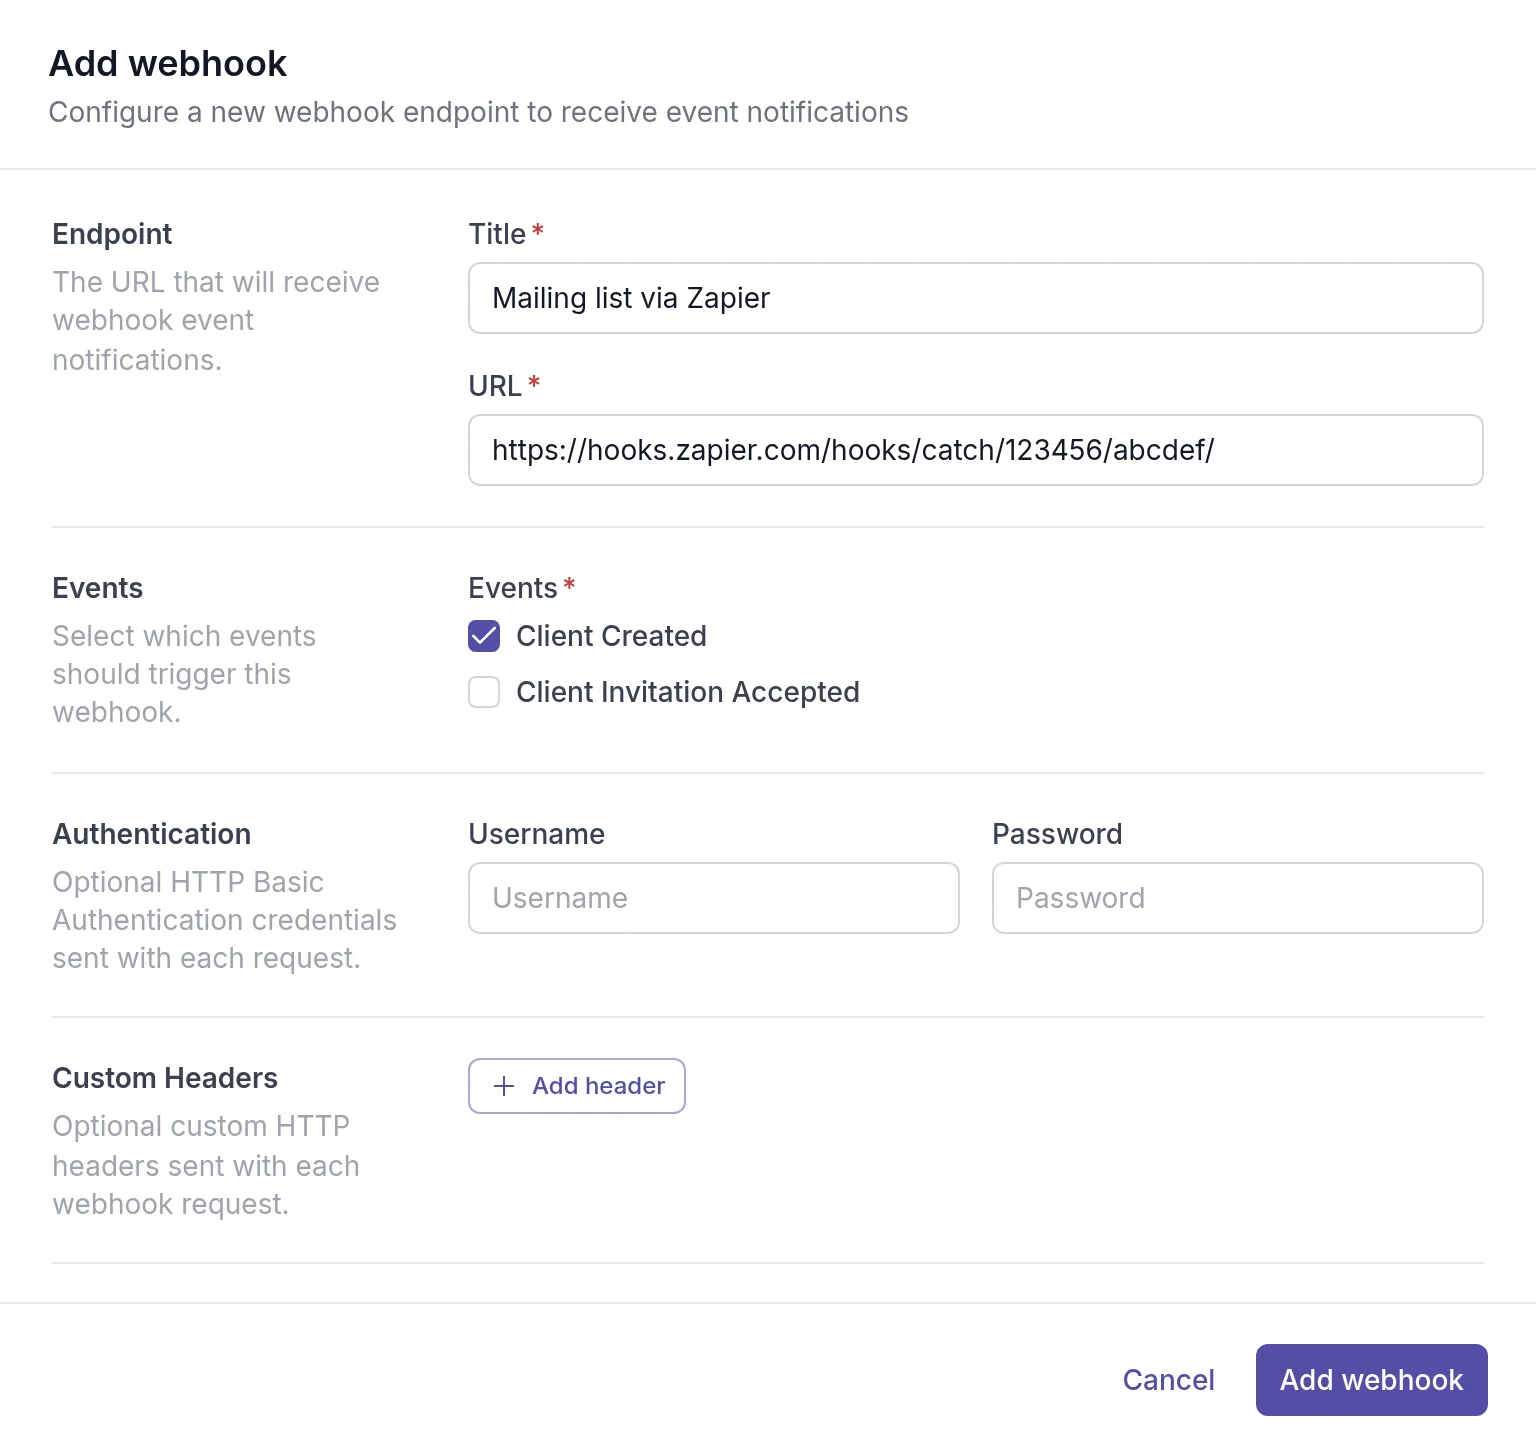
In the Add webhook dialog:
- Title helps you recognise the webhook, for example “Mailing list via Zapier”.
- URL is the address that should receive the messages. It must start with
https://. - Under Events, select the events you want to send.
- Under Authentication, enter a Username and Password only if the receiving system asks for HTTP Basic Authentication.
- Under Custom Headers, click Add header to add a Header name and Header value, for example an API key the receiving system needs.
Leave Enabled on and click Add webhook.
Quenza now sends a message to the URL each time one of the selected events happens.
If you have reached the number of webhooks your plan includes, Quenza tells you when you click + Webhook.
Example: add new clients to a mailing list with Zapier
Section titled “Example: add new clients to a mailing list with Zapier”Zapier connects apps without code. With its Webhooks by Zapier app, Zapier can receive Quenza’s client.created message and pass the client’s name and email address to your mailing list tool, CRM or spreadsheet. Webhooks by Zapier is a premium Zapier app, so you need a paid Zapier plan. Zapier’s screens change from time to time; the steps below describe the general flow.
- In Zapier, create a Zap. As the trigger, choose Webhooks by Zapier and the event Catch Hook.
- Copy the webhook URL Zapier shows on the Test tab. It starts with
https://hooks.zapier.com/. - In Quenza, add a webhook with that URL and select the Client Created event.
- Add a test client in Quenza, with a name and an email address at example.com, so Quenza sends a message.
- Back in Zapier, click Test trigger. Zapier shows the message it received, with fields such as
client.first_nameandclient.email. - Add an action for your mailing list tool, such as adding a subscriber, and fill its fields with the client’s details from the trigger.
- Publish the Zap.
From now on, every client added in Quenza is added to your list as well. Delete the test client afterwards, also from your mailing list.
Manage your webhooks
Section titled “Manage your webhooks”The Webhooks page lists your webhooks with their URL, the number of calls and whether they are enabled. Click the ⋯ menu next to a webhook to:
- Edit its settings. Click Save changes when you are done.
- Disable it to stop sending messages without deleting it, or Enable it again.
- Show History to see the messages Quenza sent.
- Delete it permanently.
While a webhook is disabled, Quenza sends nothing to it. Events that happen in that time are not sent later.
Check what was sent
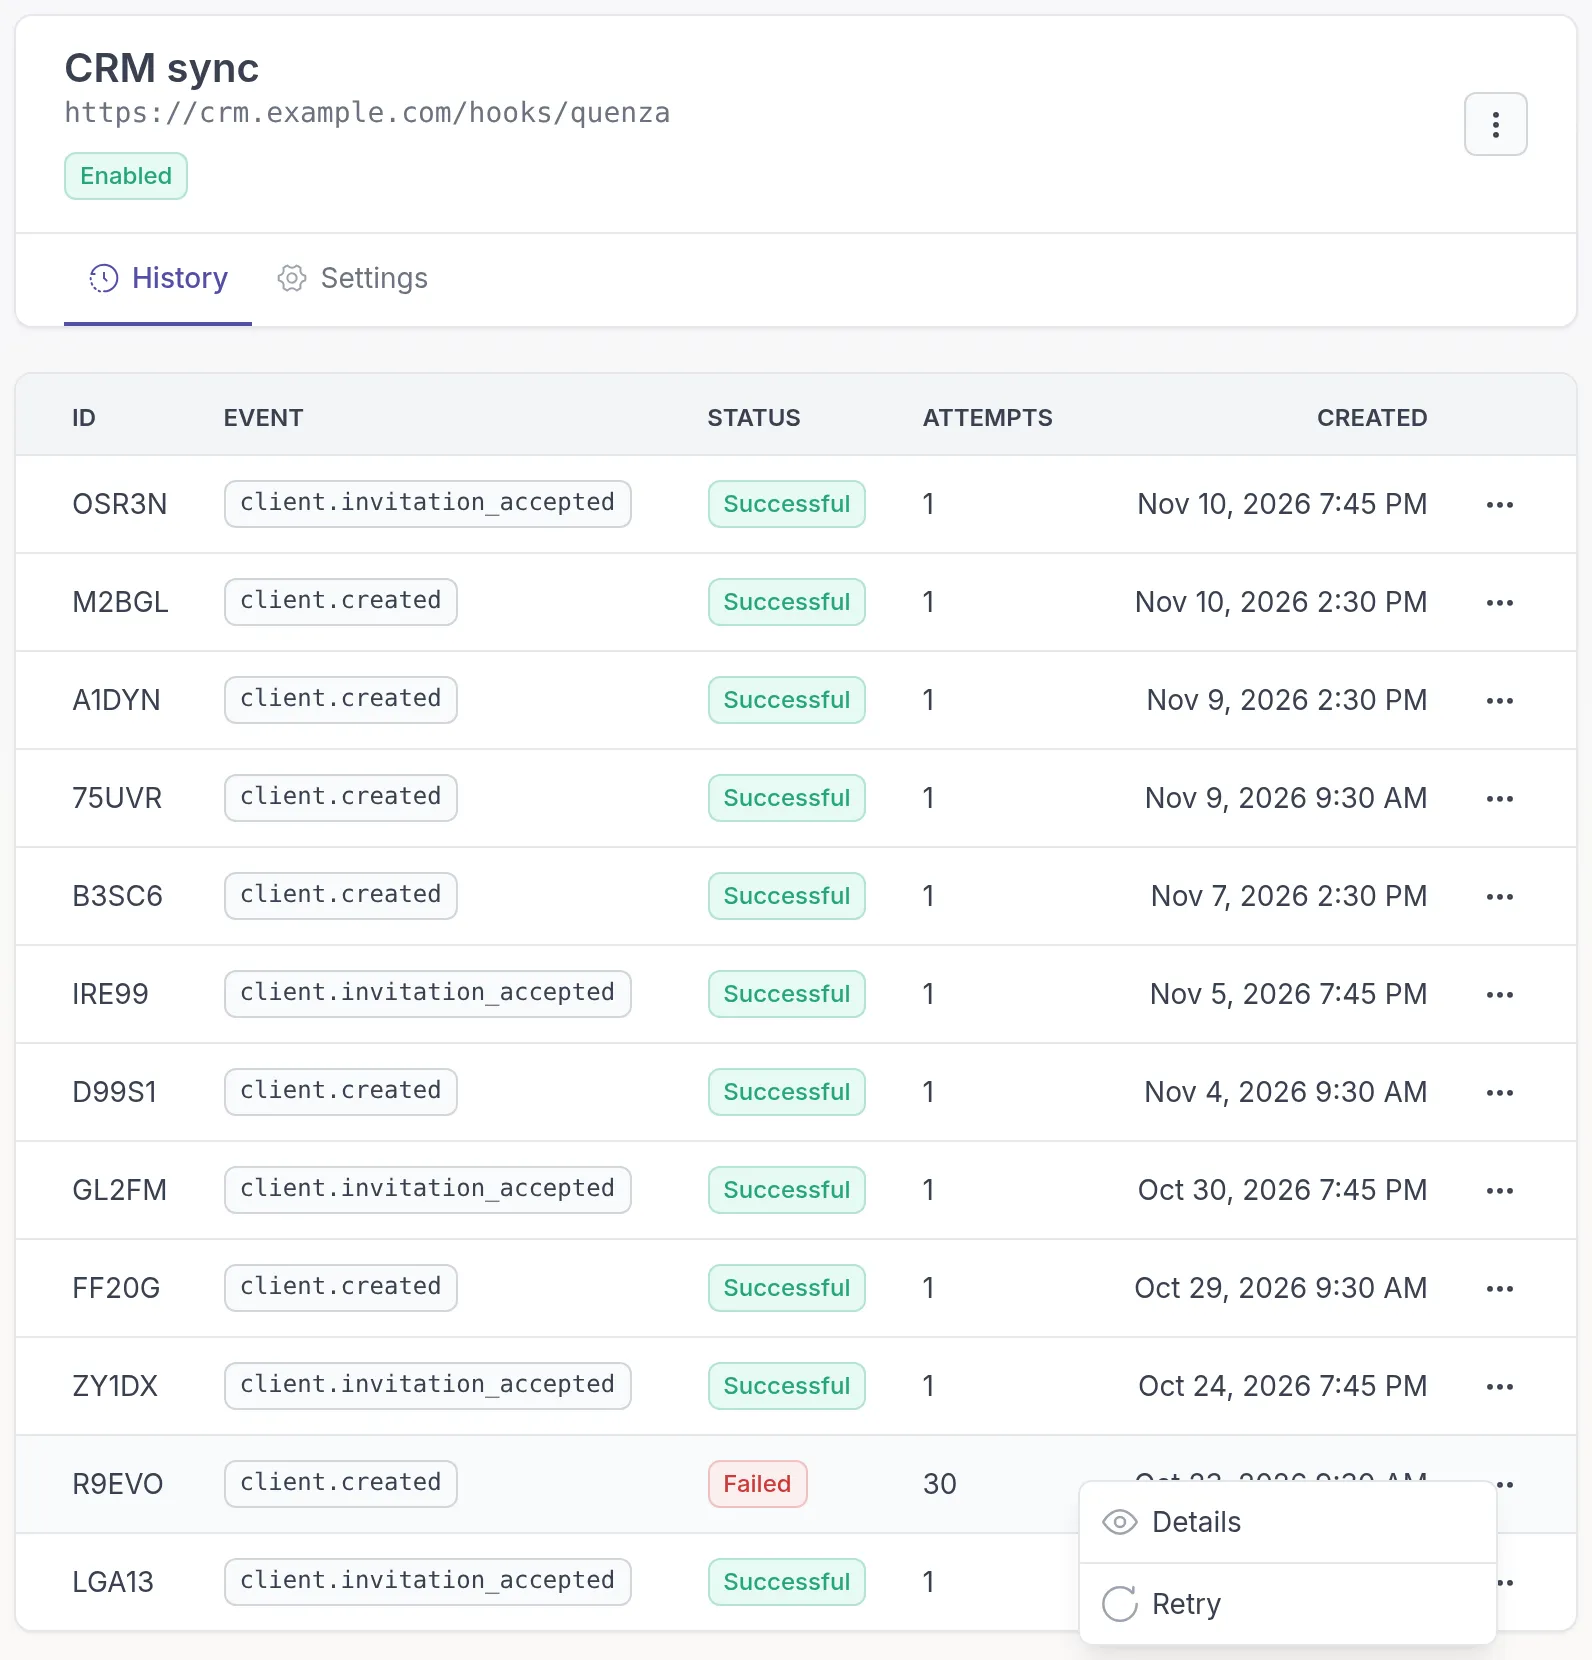
Section titled “Check what was sent”When something doesn’t arrive in your other system, start with the webhook’s history. Click the webhook on the Webhooks page. The History tab lists every message, with its event, status and number of attempts. Click a message, or choose Details in its ⋯ menu, to see the HTTP status and response your system returned and the payload Quenza sent.
A message has one of these statuses:
- Pending: waiting to be sent.
- Successful: your system confirmed it received the message.
- Retrying: sending failed and Quenza will try again.
- Failed: Quenza stopped trying.
Failed messages and retries
Section titled “Failed messages and retries”Quenza counts a message as delivered when your system answers with a 2xx HTTP status code, such as 200. Any other answer, or no answer within 30 seconds, counts as a failure.
After a failure, Quenza tries again, first within about a minute, then with longer and longer waits up to every 4 hours. After 30 attempts, about three days after the event, the message gets the status Failed.
To send a failed message again, open the webhook’s History tab, click the ⋯ menu next to the message and choose Retry. Quenza sends it once more as a new message in the history. You can retry each failed message once.
For developers: what Quenza sends
Section titled “For developers: what Quenza sends”The API reference has the full details for developers: Receive webhooks, with a complete receiver in JavaScript, Python and PHP, and the fields of client.created and client.invitation_accepted.
Quenza sends an HTTP POST request with a JSON body to your URL. Each request has these headers:
Content-Type: application/jsonX-Quenza-Event: the event name, for exampleclient.createdAuthorization: Basic …if you set a username and password- Any custom headers you added
The body of a client.created request looks like this:
{ "client": { "id": "K3V9XQ", "email": "jane@example.com", "first_name": "Jane", "last_name": "Doe", "is_guest": false, "status": "pending", "created_at": "2026-11-13T09:30:00+00:00" }, "invited_by": { "id": "R7M2PL", "email": "alex@example.com", "first_name": "Alex", "last_name": "Smith" }}invited_by is the professional who added the client. For a landing page signup, it is the professional the signup formSignup formThe form on a landing page that turns a visitor into a client. You choose what it asks and whether people join straight away or wait for your approval. assigns new clients to.
The body of a client.invitation_accepted request has only the client object, with one more field, invitation_accepted_at.
status is pending for a client who hasn’t accepted their invitation yet, active for an active client or a guest, and archived for an archived client.
The body does not contain the event name. Read it from the X-Quenza-Event header.
Your system may receive more than one message for the same client. For example, a guest who is later converted to a client with an account triggers client.created twice, and a message that timed out is sent again even if your system already processed it. Use the client id to avoid processing the same client twice.
Related
Section titled “Related”Was this article helpful?
Thanks for letting us know.
Thank you. We read every answer and use it to improve this article.